Menu -> Home
Home is your social feed.
Home includes public posts made by users you are following. Home also includes any posts made to groups you are a member of.
Any posts made by you on the Home page are considered Public posts and can be seen by anyone following you or in any groups with you.
Although, you will see group posts on the home page, group posts, using the Talk menu, are not public and are private to the group the post was made in.
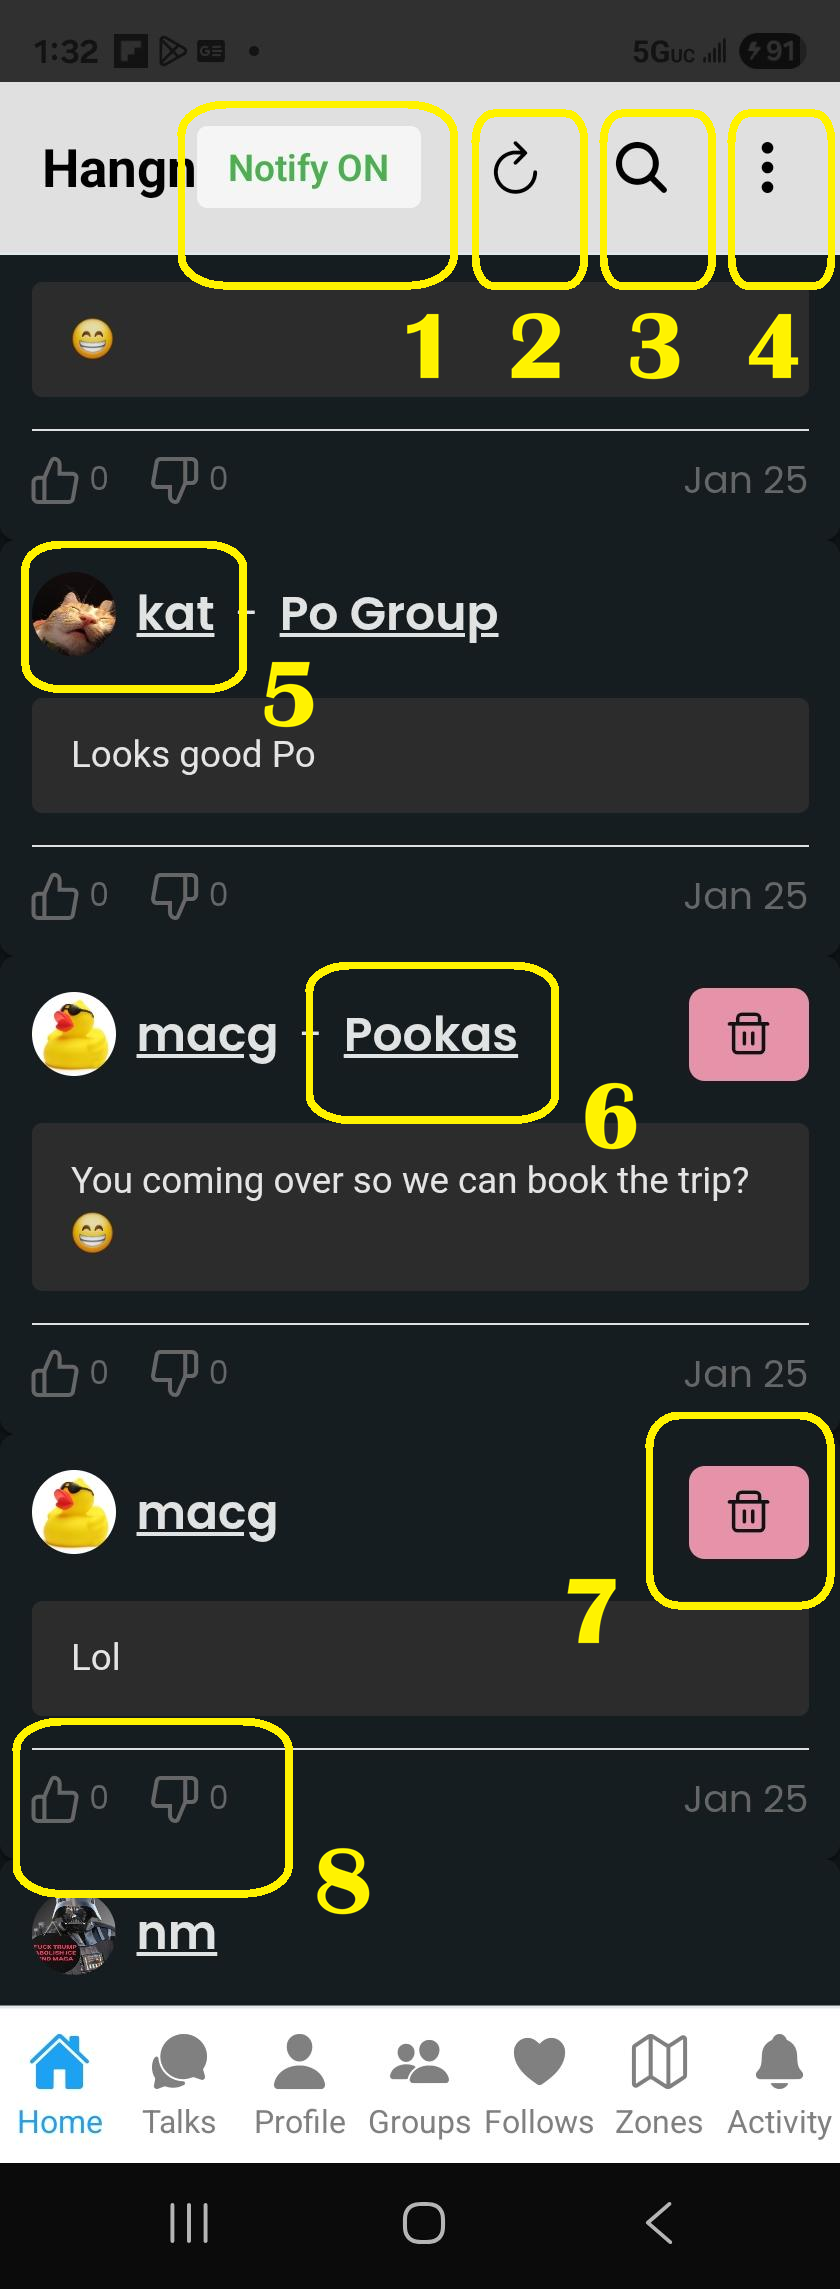
- 1 – Notify
- When ON, notifications will be sent out for you according to settings.
- When OFF, notifications will not be sent out for you at all.
- 2 – Refresh Page
- 3 – Search People
- Shortcut to Search User Page.
- 4 – Sub-Menu
- 5 – Post User
- User who created the post.
- 6 – Group of Post
- If post was for a group it will show here.
- 7 – Delete Post
- 8 – Like / DIslike Post
Menu -> Talks
Talks menu is used to select a specific group to post messages to. Everyone in the group will see the message, but only members of that group will see the message.
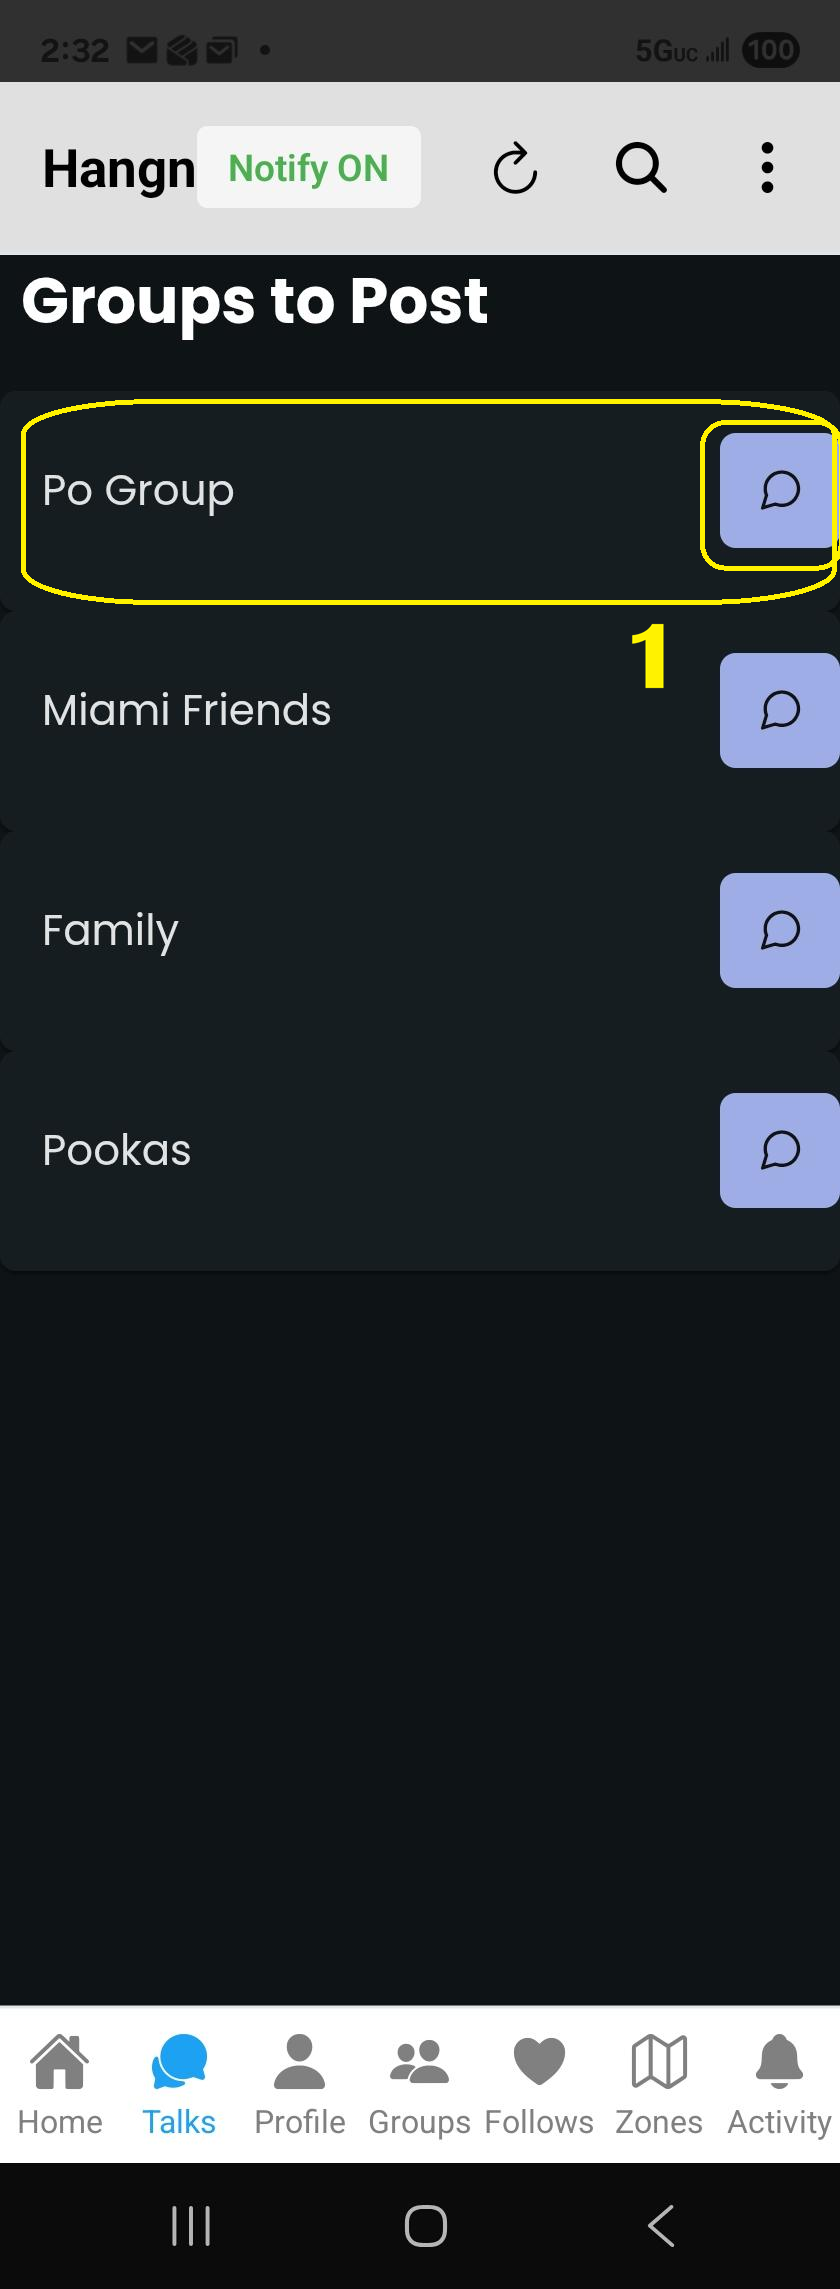
- 1 – Group to Post message to.
- Clicking on button or group name goes to same place.
Menu -> Profile
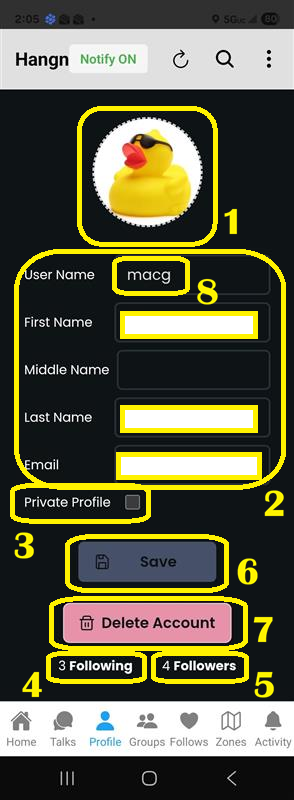
- 1 – Click on Avatar to Change
- 2 – First Name and Last Name and Email required.
- 3 – If profile private
- Followers can’t see public posts.
- Followers don’t get public zone / location notifications.
- 4 – Number of users following you. Clickable to see the user list.
- 5 – Number of users you are following. Clickable to see the user list.
- 6 – Save button disabled until changes are detected.
- 7 – Deletes your profile and all associated data, including zones, posts, notifications, activities, etc. and logs you out.
- BEWARE this process is irreversible!
- 8 -User name / Login name
- BEWARE – if changed, you will need to use new user name to login.
Menu -> Groups
Groups page is a way to segregate users, posts and zones. Public zones will send notifications to basically everyone, anyone following you or anyone in a group with you. Private zones will send notifications to no one, except for group members of the group where the private zone is added.
In short, Public zones dont need to be added to groups for people to get notifications of them in your group. Private zones need to be added to a group for group members to get a notification of them.
Posts made to specific groups, using the Talks menu, stay with members with-in that group. Posts made using the home page are public posts and go to everyone, followers and users you are in groups with.
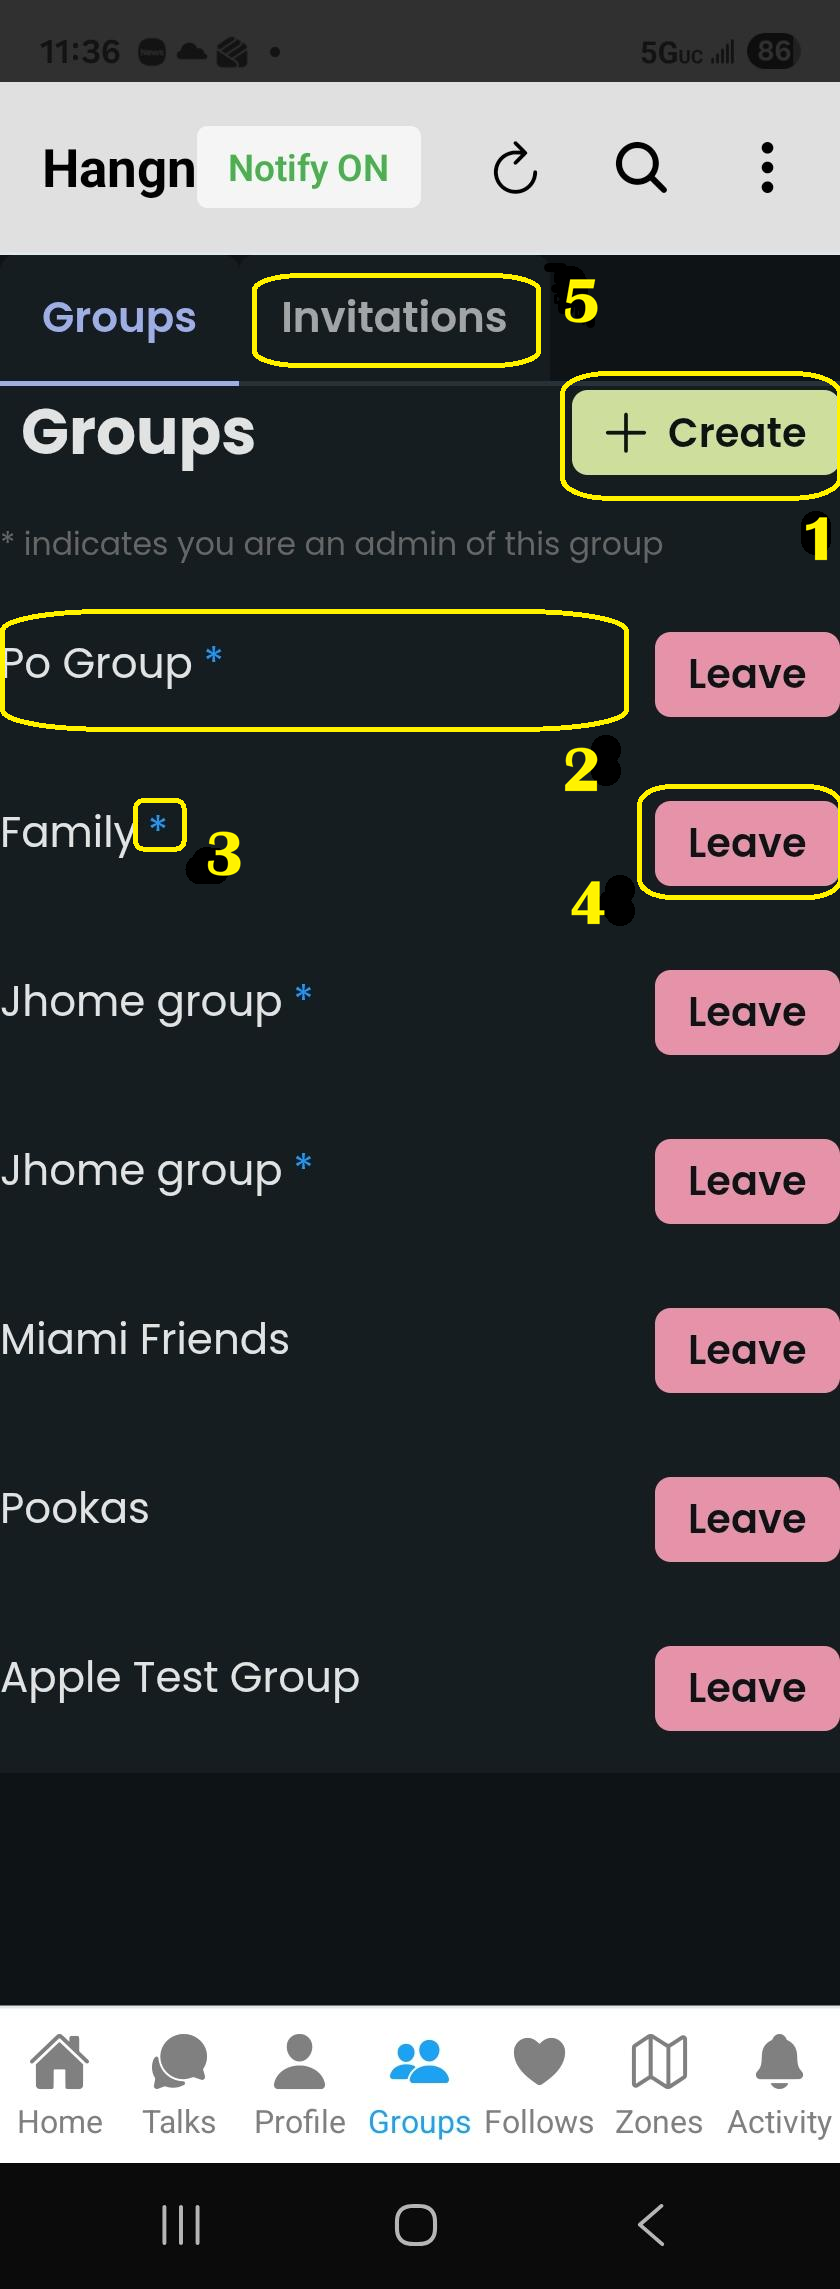
- 1 – Click to create a new group.
- 2 – Click to go to group details view.
- 3 – If a group name is followed by an asterisk * it means you are administrator of the group.
- 4 – Click to Leave the group.
- 5 – Invitations Tab to look at Group Invitations you have received.
Menu -> Follows
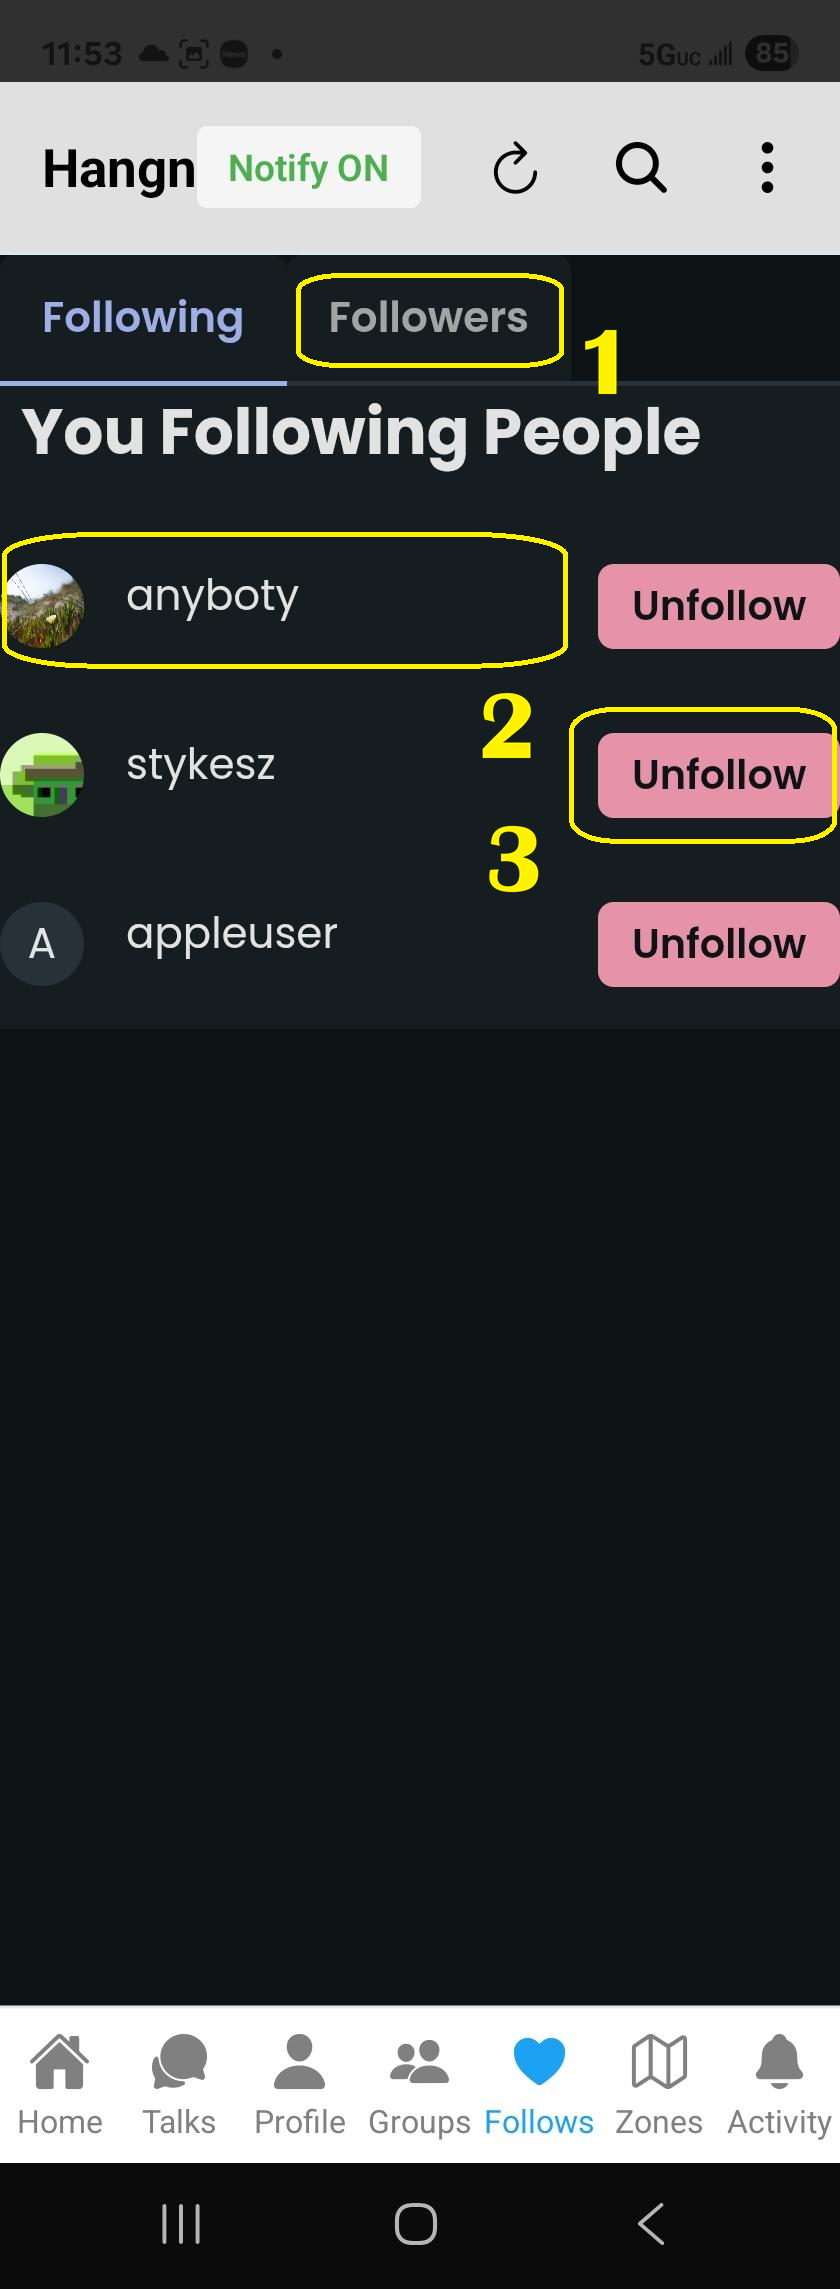
- 1 – Followers tab – Shows list of users following you.
- 2 – Click on any user name and it takes you to their public profile page, also called user home.
- 3 – Click on unfollow to stop following a user.
- Unless you are in a group with them – you will NOT see their public posts, public notifications nor public activities if you are not following them.
Menu -> Zones
This is the main page where all the magic happens. This is where you create Public or Private Zones that you wish to share with users or group members. There is a lot of functionality built into this view in order to make it easy to use.
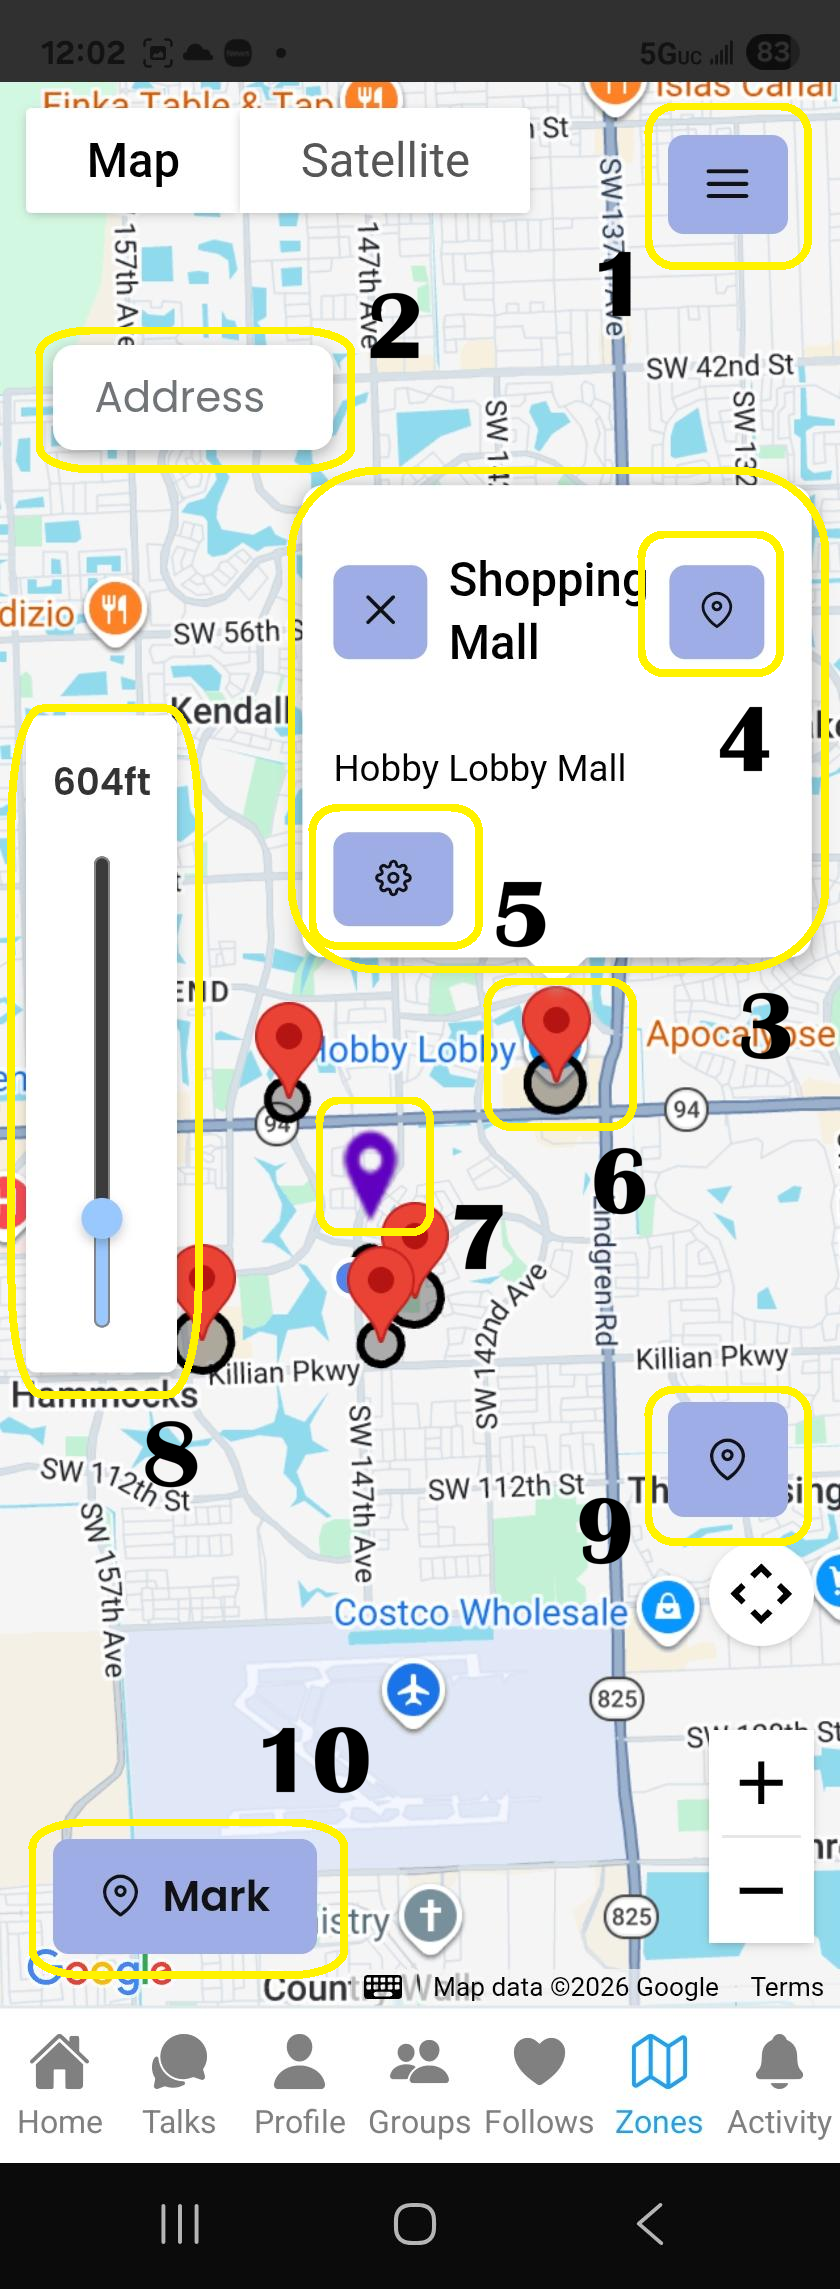
- 1 – Sidebar list of Zones
- If you click on any zone it will center the map on the zone and open the zone info window.
- 2 – Create Zone from Address
- If you have an exact address you want to create a zone for it, type address and hit enter. Zone save dialog will show to add Title and Description.
- 3 – Selected Zone Info Window
- Clicking on a marker will open info window showing Zone Title and Description.
- 4 – View on Google Maps for Android or Apple Maps for IOS.
- Clicking on this button will open up google maps on Android or apple maps on IOS to get directions from your current location.
- 5 – View Zone Profile
- Takes you to Zone Profile page where you can edit Title, Description and set marker to private.
- 6 – Public Zone
- Reflected by default google maps marker color (Dark Orange) with a marker pin and radius circle.
- When you enter the radius or leave the radius, users following you or in a group with you are notified.
- 7 – Private Zone
- Reflected by purple marker pin and radius circle.
- When you enter the radius or leave the radius, only users of the group(s) you added this zone to, will be notified. No followers and no group members are notified unless the user is in the same group this zone has been added to.
- 8 – Selected Zone Radius Circle Control
- Shows selected zone radius circle size (in feet) and can be used to adjust the size, larger or smaller.
- 9 – Center Map on User
- Centers map to your current location, IF available.
- 10 – Create Zone Toggle Button
- How to use,
FIRST – Click on Mark button
SECOND – Click on any area on the map - If Mark button was clicked accidentally, click on Mark button again to toggle it off.
- How to use,
Menu -> Activity
Activity menu keeps the history of all activities you have received notifications for. Clicking on any activity will take you to the page where you will be able to see the detail of the activity.
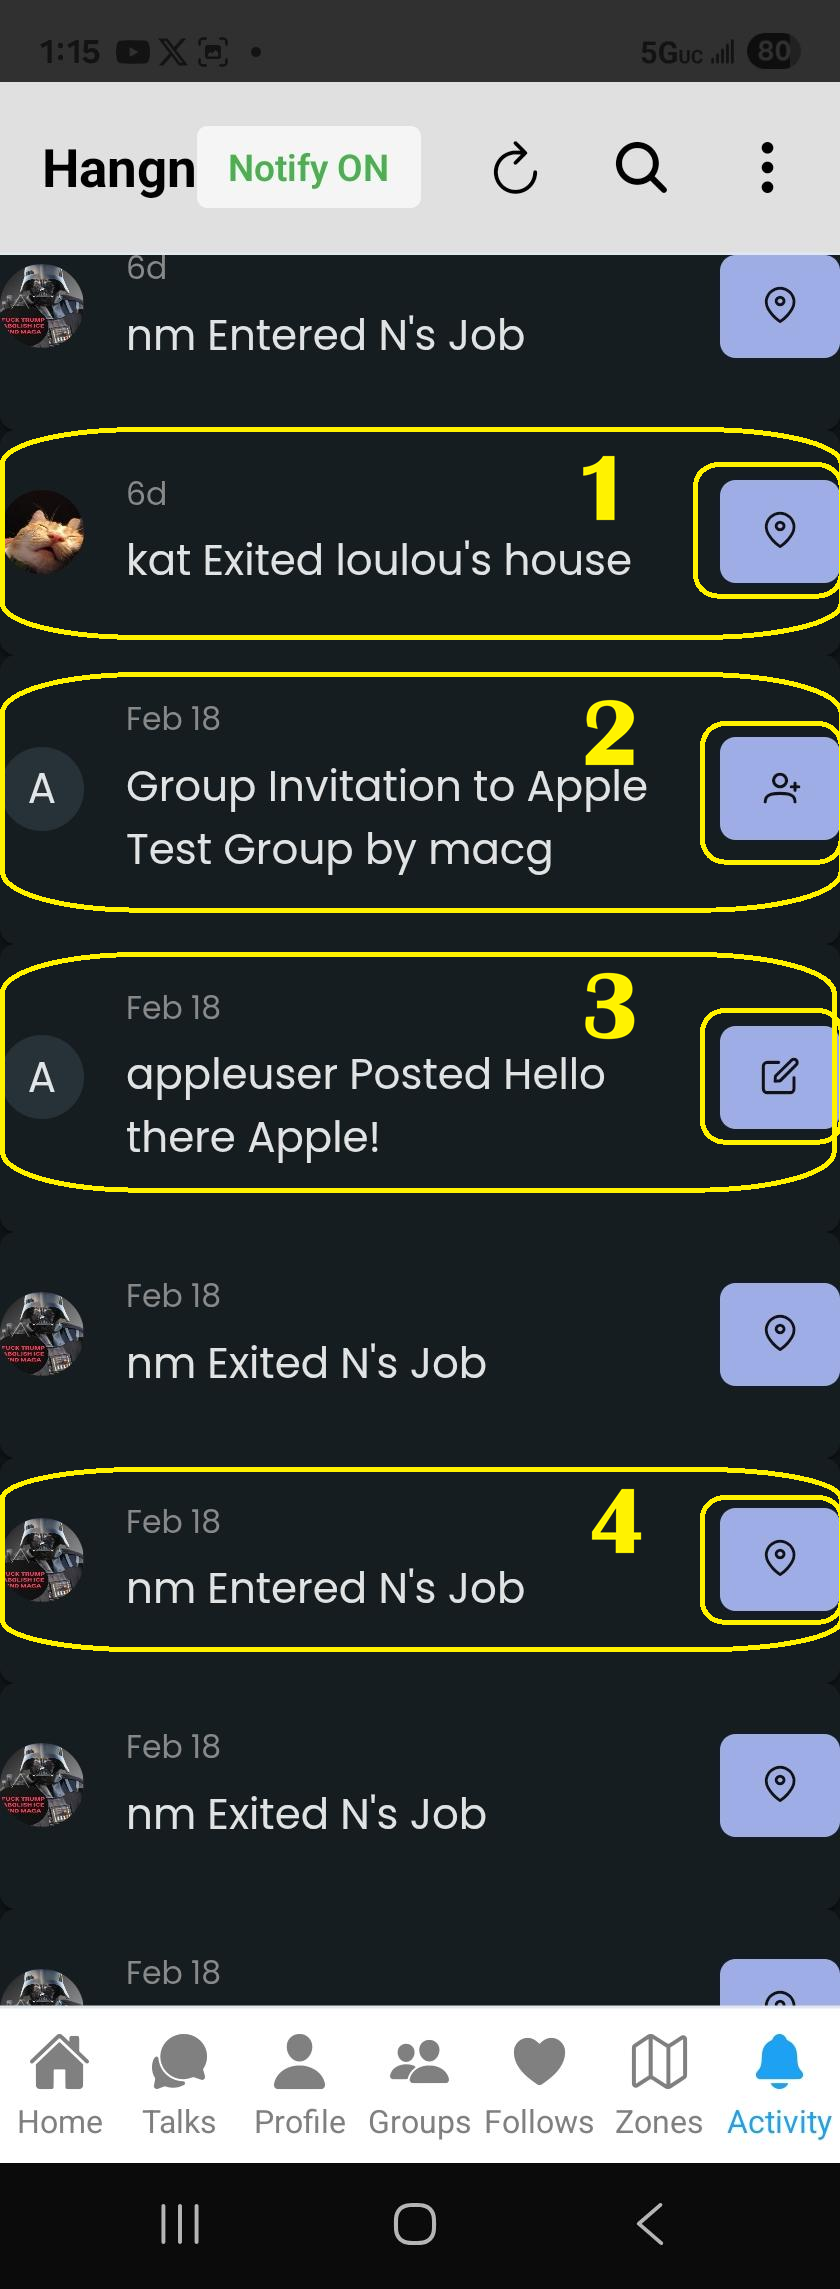
- 1 – Exit Zone Notification
- Clicking on label or button takes you to Zone menu and centers the Zone of the notification.
- 2 – Group Invitation Notification
- Click on label or button takes you to the Group Invitation page to accept or reject invitation.
- 3 – Post Notification
- Click on label or button takes you to the post page where you can view new post.
- 4 – Enter Zone Notification
- Clicking on label or button takes you to Zone menu and centers the Zone of the notification.
- 5 – New Zone Notification (
- NOT LISTED IN SCREENSHOT
- Clicking on label or button takes you the new Zone created by someone you follow or someone in your group.